Recently I’ve had some correspondance with other photographers about geotagging, what it is and how I am using it. I was encouraged to put my remarks on my blog. While I do not pretend to be an expert, I am happy to share what I am doing — my workflow if you will. I’ll probably revise this post as I give the matter further thought.
GEOTAGGING DIGITAL PHOTOS is the process of tagging (i.e., merging, joining) digital photos with information about the location where they were taken. So, geotagging (v) is a process in which digital photos are modified. Geotagged (adj) describes a digital photograph as having location information embedded in it. Wikipedia has a good article about geotagging.
1. Digital Photos and Metadata. Digital photos exist as computer files. Two common file types (formats) are JPEG, TIFF, but there are many others. Many of these file formats store not only the image itself (the pixels) but also metadata about the image. Metadata means “data about data”. In this case, the primary data are the pixels in your digital image, and the metadata are other pieces of information the describe the photo or the circumstances under which it was taken. Some examples of metadata are the date and time at which the photo was recorded, the camera exposure settings, the camera brand and model, lens focal length and even the version of the camera’s firmware. These metadata are organized into a bundle and stored in the file header of your digital file. In other words, this stuff is in your TIFF, JPEG or raw file. It happens to be stored at the beginning of the file, before the pixels. Maintaining these metadata inside your digital photo file is, in theory, a good thing since this information then remains with its associated image. As long as you have the photo, the data about how, when and where it was taken are in your possession as well. Furthermore, if you make derivative copies of the digital file, such as a smaller version for display on the internet or a version to send to an editor at a magazine, the metadata are in that version of the image too. Ideally, the metadata stay with the photo wherever it goes. (Naturally there are exceptions to this which I won’t get into, but you get the idea.)
2. EXIF Metadata. An industry group (e.g., a group of computer geeks with decision making power) developed a standard, or group of widely accepted rules, for organizing these metadata. They named the standard EXIF. Each piece of information in this bundle of EXIF metadata is known as an “EXIF field”. For example, date, time, lens, camera model, shutter speed, etc. are all “EXIF fields”. So, when you hear mention of “the EXIF data”, or “EXIF header”, just know that this refers to the metadata describing when and how the photograph was taken. EXIF metadata are generally considered readonly in the sense that they should not be altered. Indeed, most image editing programs such as Photoshop will allow you to see what the EXIF fields are but do not allow you to alter the EXIF fields. This readonly restriction is really just an industry practice — there is no physical reason why the EXIF fields cannot be altered. Indeed, there are software programs out there that allow you to fiddle with and change the EXIF fields, such as time, date, camera model, etc., but I don’t have any experience with them. For the most part EXIF data are created at the moment the image is taken and there is no reason to change them later — with the exception of latitude, longitude and altitude.
It should be mentioned that there are some other bundles of metadata that may be found in the header of your digital photo and which can be viewed with image management and editing software. XMP and IPTC are two of them. XMP is a more recent standard that, in the long run, may prove to be more flexible and useful than EXIF which has some shortcomings. IPTC is another group of metadata fields, developed for press photographers to store descriptive information about their news photographs. IPTC is the place where you would enter a caption, keywords and copyright restrictions about the photo. While XMP and IPTC are important groups of metadata for digital photographers to understand, I will only be describing the EXIF metadata since that is where latitude and longitude fields are.
3. The Latitude, Longitude and Altitude Fields in the EXIF Metadata. There are three EXIF fields of interest for geocoding: latitude, longitude and altitude. While there are some recent cameras that support communication with GPS equipment in real time and fill these EXIF fields when the photograph is taken, most of us will find that these fields are empty or do not exist in the EXIF metadata of our photographs. Essentially this is because the camera is unaware of your latitude, longitude and altitude. Sure, the camera probably knows the date and time (you set these when you first get your camera) and it sure knows what lens is being used and what the shutter speed is. But in general, your camera does not know where you are. The EXIF standard includes fields (spaces) for latitude, longitude and altitude. But since the camera does not know your location when the photo is taken, these fields are left empty. Its up to you to fill them in later by geotagging the photo after it has been downloaded to your computer.
4. Recording GPS Data. There’s not much to say here. Simply purchase a GPS that supports tracking latitude/longitude to data files, then carry the GPS with you and make sure it is tracking your location while you while you shoot photos. I use the relatively small Garmin 60CSX model, which is capable of determining latitude, longitude and altitude to within about 20′. That is accurate enough for my purposes. I installed a 4GB micro-SD memory card in the Garmin 60CSX and set up the tracking options so that when I turn it on it automatically records latitude, longitude, altitude and time to a file on the memory card. There are various spatial and/or temporal intervals at which points on the track can be recorded; I have chosen 10-second intervals. (On one flight I made I chose a mode in which a location point was recorded to the track whenever the plane had travelled more than about 20 yds so it recorded many points during the flight. The result was a big GPS data file but very accurate geotagging later when the location data were stored in the photos.) On a recent 10-day trip, during which I had the unit recording about half of all daylight hours, I found that less than 1% of the 4GB micro-SD memory card was used to store tracking data. I have a few multi-week trips planned in 2009 and 2010, and this setup should record the GPS data for every moment of the trip with no trouble. I do find that I have to change batteries at least once a day if the unit is continuously operating, so rechargeable AA batteries are the way to go. The files that are created on the memory card are “GPX” files; GPX is simply a form of XML text file that geotagging programs understand. On my Garmin 60CSX, one file per day is created containing all the GPS tracking data for that day (even if I have turned the GPS on and off several times during the day). When I return from a photo outing, I can either connect the GPS to my computer and transfer the GPX files from the GPS to the computer, or I can remove the memory card from the GPS and plug the card into my computer and access the GPX files that way. Ultimately, I put all of them into the same folder on my computer, a growing pile of GPS files that just sit there until I need them for geotagging. Here are two examples of GPS tracks. You will need Google Earth installed to view these. The first is a trip around Vancouver Island. The second is a bike ride around UCSD in La Jolla. Note no photos are shown with these tracks, that will come later.
5. Geotagging: Merging GPS Data Into Your Digital Photos. You have finished the shoot and you carried your GPS with you the whole time, tracking your location while you took photos. You are back in your office and its time to do the geotagging! This is the point in your workflow where latitude and longitude metadata are transferred from your GPS into the EXIF fields within your digital photos.
Everyone shooting digital photos understands that photos must be “downloaded” to one’s computer, right? Well, the same goes for the GPS data: you must download the data files from your GPS unit as well. The actual geotagging, where the photos and GPS data are combined, can occur at two points in the process: either while the images are being downloaded (i.e., copied) from your camera to the computer, or after all the files have been downloaded and are sitting on the computer in separate folders.
I use the latter approach, and here is how I do it. I use a nifty little program named GPicSync, available free from Google. I make no claim as to its performance, but I have found that it works well for me.
- Download the GPX tracking files (i.e., files with extension .gpx) from the GPS unit’s memory card to a folder on my computer. The Garmin 60CSX happens to make one GPX tracking file per day with names like 20080811.gpx; other GPS units may be different in this regard. I place all the GPX files in a single folder; mine happens to be named “c:/gpx” but you can put them wherever you wish.
- Download the files from my camera’s memory card(s) to another folder on my computer. Let’s say the folder is named “c:/pics”. The files produced by my camera are raw files, but they could just as well be JPGs.
- Launch GPicSync. I first specify the folder where the GPX files are located. I just point it at the entire group of GPX files and it figures out which ones it needs. Then I specify the folder where the digital photos are located. Lastly, I specify the “UTC Offset”. This is the number of hours between the location where the images were shot and Greenwich Mean Time. This is needed because my camera’s internal time zone is local to me, but the GPS records time using Greenwich Mean Time. If the photos were taken in my neck of the woods (Pacific Time Zone) then the appropriate difference is -7 hours, so I enter -7 for the UTC offset. Then I press “start”.
- What happens? GPicSync looks at the time at which each photo was taken, compares that to all possible GPS tracking points that it finds in the GPX tracking files and finds the closest match. In other words, it determines which GPS point was recorded closest in time to when the photo was taken. The latitude, longitude and altitude are extracted from that GPS point and inserted into the appropriate EXIF fields in the digital photo. Nothing else is altered (hopefully!) and the digital photo is written back to the computer disk. In essence all that is changed is three EXIF fields in the digital photo, all the other information including the image pixels themselves are unchanged. At least this is how it is supposed to work, and so far I have encountered no problems.
- I am now free to continue on with my workflow and raw files, converting them into JPEGs and preparing them for display on the web and delivery to clients. They are now geotagged so (again, hopefully) the software that I use to manage my photo collection, make JPEG versions for the web and high res TIFFs for clients ensures that the location information in the EXIF metadata is passed along from one generation of the photo to the next.
There are other software programs that can do this geotagging step. I chose GPicSync primarily because it supports tagging Canon raw files. In other words, it will go ahead and permanently alter the EXIF data (adding latitude, longitude, altitude) in my Canon raw files. This is a requirement for me, since I want as much metadata in the source image (my raw file) as possible. However, if you shoot JPEG then you have other options. Notably, I should mention a program named Downloader Pro, made by the developer of Breezebrowser Pro. I have been a longtime user of Breezebrowser and love it, it is perhaps the fastest and easiest image browsing program out there. When I set out to geotag my photos I planned to use Downloader Pro (a companian program to Breezebrowser Pro), but I soon found that it has a limitation that I cannot work around: it will not geotag Canon raw files (.cr2). I shoot exclusively raw files. I generate JPG and TIFF files from the raw files, but the “master” file is a raw file and the master file is the one I want geotagged. I emailed Chris Breeze (the maker of Breezebrowser and Downloader) about this and asked him why his program does not support geotagging Canon raw files. His reply was that by altering the EXIF header in the proprietary raw file one can damage the raw file, thereby making it unreadable by other software. (I understand that this is a risk, but since I can always save an unaltered copy of the raw file before it is tagged, I can work around that issue easily.) In any event, at the time of this writing Downloader Pro does not geotag Canon raw files, so I don’t use it. If and when that changes, I will immediately reconsider and probably start using Downloader Pro.
One further note on this step: consider backing up your original digital photos before proceeding with the geotagging. The geotagging that I describe alters the EXIF information in your digital photo. In the event that the geotagging software you are using has a flaw, it could corrupt the digital photo beyond repair. GPicSync, and probably most other geotagging programs, allows you to make a backup copy of each photo while the geotagging is being done, ensuring that you have a safe copy in case something bad happens to the altered copy. Needless to say, its probably a good idea to use this option if it is available, at least with shoots that are important.
6) Geo Data Flows To The Web. OK, you have geotagged your photos. Now what the heck do you do with them? Good question. I honestly don’t know all that is possible with the software that is out there. I use Expression Media to manage my collection of 22,000 images, most having 3-5 versions apiece, including keywording, cataloging, captioning, ranking, etc. Since Expression Media allows me to view the EXIF fields of my photos, I can check that the geotagging worked and that the correct latitude, longitude and altitude appear in the EXIF metadata. Great, but that is merely an exercise and does not really move me or my photos forward.
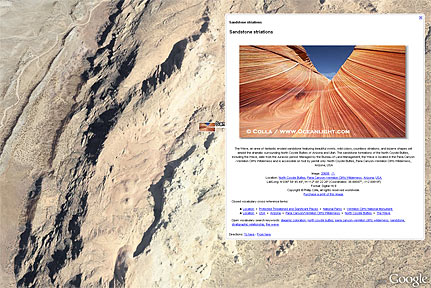
Importantly, I exploit the lat/long (latitude, longitude) data on my web site. Each photo in my collection has a corresponding record in a big database on my web server. The database has entries for location, species, keywords and a bunch of other database stuff. This database is created by Expression Media and then uploaded to the web server. This means that if Expression Media sees that an image has been geotagged, that lat/long information will flow from Expression Media to the web database. In other words, images that have been geotagged have lat/long entries in the database record, while images that have not been geotagged are missing entries lat/long entries in the database. When my website software (written by me using PHP and MySql) displays information about a geotagged image, it will notice the lat/long entry in the database and pass that information along to the display that the website visitor see. For instance, take a look at the summary information for this image of the Wave in southern Utah:

The Wave, an area of fantastic eroded sandstone featuring beautiful swirls, wild colors, countless striations, and bizarre shapes set amidst the dramatic surrounding North Coyote Buttes of Arizona and Utah. The sandstone formations of the North Coyote Buttes, including the Wave, date from the Jurassic period. Managed by the Bureau of Land Management, the Wave is located in the Paria Canyon-Vermilion Cliffs Wilderness and is accessible on foot by permit only.
Image ID: 20608
Location: North Coyote Buttes, Paria Canyon-Vermilion Cliffs Wilderness, Arizona, USA
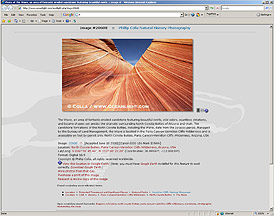
You will see not only the coordinates of the location where this image was shot, but a few links related to the coordinates and some small blue ball icons as well. What are those? Read on for the most interesting part of this whole process.
7) Geotagged Images In Google Earth. Google Earth is an amazing world visualization product from Google. At present it is available in a free version and a commercial version. I have only used the free version. I am sometimes blown away by what can be done with it. For starters, it allows one to visually fly around the world and then zoom in close, seeing Earth features from a birds eye view. That alone is pretty fun. But it gets better for photographers.
I should mention that if you do not have Google Earth installed on your computer, the discussion below will be merely academic. You won’t be able to check out the examples I mention without first installing Google Earth. Instead, click the “Google Maps” version of each link, but know that Google Maps is the lesser sibling to Google Earth when it comes to presenting geospatial stuff.
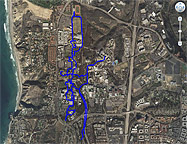
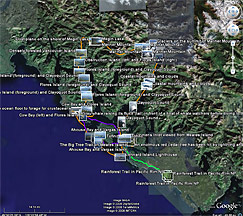
It is possible to generate Google Earth “overlays” that allow one to display almost anything in concert with Google Earth. These Google Earth overlays are similar in some ways to web pages that you view in a web browser but they are instead viewed in Google Earth, which is like a browser but for viewing the globe rather than text. For web visitors that have Google Earth installed on their computers, clicking on one of these Google Earth “overlay links” allows them to view things within Google Earth, usually in a meaningful spatial context. For instance, here are two overlays that together summarize the keepers we got in Tofino a few weeks ago. The first link presents the tracks, showing where we hiked (green), boated (purple) and flew (orange). The second link superimposes some photos above the sites where they were taken. Load both of these links in Google Earth:
 |
| Tofino tracks (view in Google Earth, Google Maps or Live Search Maps) Tofino photos (view in Google Earth, Google Maps or Live Search Maps) |
One of most oft-mentioned examples of a “GeoBlog” — a blog that is customized for Google Earth — is that of noted primatologist Jane Goodall’s Gombe Chimp research group, which publishes a blog about their ongoing activities. The blog is “geo-enabled”, meaning that not only can it be viewed as a traditional web page but it can also be viewed in an enhanced form within Google Earth at the exact location where the research is being conducted in Africa. Look for the little blue ball icons on the blog, indicating Google Earth-enabled links.
I’ve done a similar thing with most of the major parts of my web site, including the blog and the individual images. For instance, most pages on my blog are now geo-enabled. Here’s an example of an individual post of mine that is geo-enabled. The first link below just shows the blog post, while the second link displays it in Google Earth at the proper location on Granville Island in Vancouver:
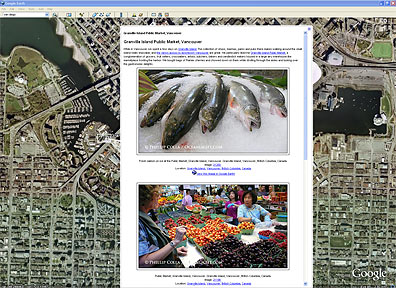
(Also, the entire blog is available as a “KML Feed”, meaning that it is a feed accessible by Google Earth. The KML 2.0 link for this is at the bottom right of the blog, under “Meta”.)
Each individual image of mine that is geotagged can be viewed in geospatial context in Google Earth, at the exact point on the globe where the photo was taken. The first of the two links below shows a detailed view of the photo on a boring web page, while the second link displays the image in Google Earth at the point in the Paria Vermillion Cliffs Wilderness where the Wave is situated and the photo was taken:
 |
| http://www.oceanlight.com/spotlight.php?img=20608 (web page) http://www.oceanlight.com/20608.kml (view in Google Earth, Google Mapsor Live Search Maps) |
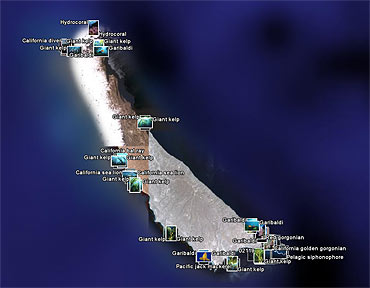
Lastly, you can view an entire collection of my images altogether in Google Earth. This was the hardest part for me to figure out, and required some geeky programming to get it right. But its now pretty powerful (at least I think so). In one fell swoop I can show you all of my images from, say, San Clemente Island, superimposed on the spots where they were taken. Or I can do this with all my blue whale images. Or those from the Galapagos, or Guadalupe Island. You get the idea. If you have Google Earth installed, check out these links and let me know what you think! Warning: each of these links displays dozens or hundreds of photos at once on Google Earth. You will need Google Earth installed to use these links.
 |
| San Clemente Island underwater photos on Google Earth (View in Google Earth, Google Maps or Live Search Maps) |
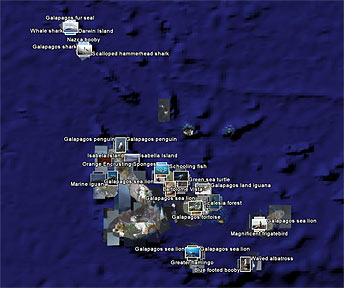 |
| Galapagos Islands photos on Google Earth (View in Google Earth, Google Maps or Live Search Maps) |
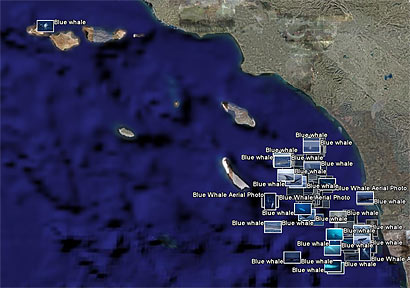 |
| Blue Whale photos on Google Earth (View in Google Earth, Google Maps or Live Search Maps) |
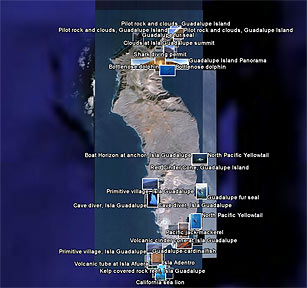 |
| Guadalupe Island photos on Google Earth (View in Google Earth, Google Maps or Live Search Maps) |
Comments? Errors? Please let me know by email and I’ll try to amend this post. Thanks.